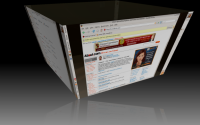
Setting up Compiz/Fusion 3D Desktop in Ubuntu


Compiz/Fusion is a 3D desktop environment for your Linux system. Its objective is to make the various elements that are visible on your computer look more physical. It aims to make your work less tiring and increase productivity through more natural visual perception.

One way to do that is by placing the windows and icons on a three-dimensional looking cube, that can be rotated. Another way is to keep the windows or menus in motion after you move or expand them, sort of like a piece of paper floating on the desk. This makes is easier to track which window or menu has just been activated.

Compiz/Fusion provides many settings and parameters to customize these effects, and the results depend each user's preferences and work habits. In my own experience I found that these features pretty much work as intended
The wobbly behavior may seem unsettling at first, but after getting used to it, it does make for a less tiring work experience.

In order to be able to use Compiz/Fusion in Ubuntu 7.10, you need to install the "Advanced Desktop Effects Settings (ccsm)" package. Here is how you set it up:


  1. Click on "Applications" on the task bar to bring up the Applications menu.
  2. From the Applications menu select "Add/Remove" to show the "Add/Remove Applications" window.
  3. Click on the "Show" selection box and select "All available applications".
  4. In the "Search" box type: "compiz". This should bring up a listing of the software along with a description.
  5. Click the check box next the "Advanced Desktop Effects Settings (ccsm)" line.
  6. Push button "Apply Changes".
  7. Click "OK" in confirmation dialog window.
  8. Click on "Apply" on summary dialog window.
  9. In dialog window "New application has been installed" click "Close" button.

Now you can run the the CompizConfig Settings Manager as follows:

  1. Click on "Systems" on the task bar to bring up the System menu.
  2. From the System menu select "Preferences".
  3. From the Preference menu select "Advanced Desktop Effects Settings.

This should bring up a window with the title "CompizConfig Settings Manager". The user interface has several sections, starting with "General", "Accessibility", "Desktop", and "Effects". To set up the cube, you should start by setting the number of desktops to four as follows:

  1. Click on "General Options" in the section "General" to bring up a screen with several tabs.
  2. Click on the "Desktop Size" tab to show three sliders.
  3. Set the slider "Horizontal Virtual Size" to "4" (this will give the cube four sides to rotate to).
  4. Click on the "Back" button in the lower left hand corner to return to be previous screen.

Then you need to mark the check boxes of "Desktop Cube" and "Rotate Cube" in the "Desktop" section. Now you can rotate the cube by dragging the the middle mouse button on the background.

To enable wobbly windows, mark the corresponding check box under "Effects". To make the menus wobbly as well, click on the "Wobbly Windows" button, select the "General" tab, and change "Map Effect" to "Shiver".


Comments

chiquillo said…
hey,
thanks for ur articles, i m watching u ;)

Popular posts from this blog

How to enable proxy service security in ESB 4.9.0?

Security is  one of the major concern when we developing API base integrations or application developments. WSO2 supports WS Security , WS-Policy and WS-Security Policy specifications. These specifications define a behavior model for web services. Proxy service security requirements are different from each others. WSO2 ESB providing pre-define commonly used twenty security scenarios to choose based on the security requirements. This functionality is provided by the security management feature which is bundled by default in service management feature in ESB. This configuration can be done via the web console until ESB 4.8.1 release, but this has been removed from the ESB 4.9.0. Even though this feature isn't provided by the ESB web console itself same functionality can be achieved by the new WSO2 Dev Studio . WSO2 always motivate to use dev studio to prepare required artifacts to the ESB rather than the web console. Better way to explain this scenario is by example. Following

How to preserving HTTP headers in WSO2 ESB 4.9.0 ?

Preserving HTTP headers are important when executing backend services via applications/middleware. This is because most of the time certain important headers are removed or modified by the applications/middleware which run the communication. The previous version of our WSO2 ESB, version 4.8.1, only supported “ server ” and “ user agent ” header fields to preserve with, but with the new ESB 4.9.0, we’ve introduced a new new property ( http.headers.preserve ) for the passthru ( repository/conf/ passthru-http.properties ) and Nhttp( repository/conf/ nhttp.properties ) transporters to preserve more HTTP headers. Passthru transporter – support header fields               Location Keep-Alive Content-Length Content-Type Date Server User-Agent Host Nhttp transport – support headers Server User-Agent Date You can specify header fields which should be preserved in a comma-separated list, as shown below. http.headers.preserve = Location, Date, Server Note that

How to monitor the Thread CPU usage in the WSO2 Products?

1. Download JConsole topthreads Plugin. 2. Add following entries to the PRODUCT_HOME/bin/wso2server.sh     -Dcom.sun.management.jmxremote \     -Dcom.sun.management.jmxremote.port=PORT \     -Dcom.sun.management.jmxremote.ssl=false \     -Dcom.sun.management.jmxremote.authenticate=false \     -Djava.rmi.server.hostname=IP_ADDRESS \ Define your IP_ADDRESS address and PORT (port should be not used anywhere in that instance) 3. Run the JConsole using following command.     jconsole -pluginpath PATH_TO_JAR/topthreads-1.1.jar 4. Copy "JMXServerManager JMX Service URL" from the wso2carbon logs after restart the Wso2 Server (Eg:- service:jmx:rmi://localhost:11111/jndi/rmi://localhost:9999/jmxrmi) to the Remote process with the username and password. 5. Under Top Threads tab you can monitor the thread CPU usage.